5/21/2018

Spring RequestMapping

In this article, we’ll focus on one of the main annotations in Spring MVC – @RequestMapping.
Simply put, the annotation is used to map web requests to Spring Controller methods.


2. @RequestMapping Basics

Let’s start with a simple example – mapping an HTTP request to a method using some basic criteria.

2.1. @RequestMapping – by Path


@RequestMapping(value = "/ex/foos", method = RequestMethod.GET)
@ResponseBody
public String getFoosBySimplePath() {
    return "Get some Foos";
}
 
 
To test out this mapping with a simple curl command, run:
 
curl -i http://localhost:8080/spring-rest/ex/foos
 

2.2. @RequestMapping – the HTTP Method

The HTTP method parameter has no default – so if we don’t specify a value, it’s going to map to any HTTP request.
Here’s a simple example, similar to the previous one – but this time mapped to an HTTP POST request:

 
@RequestMapping(value = "/ex/foos", method = POST)
@ResponseBody
public String postFoos() {
    return "Post some Foos";
}
 
 To test the POST via a curl command:
 
curl -i -X POST http://localhost:8080/spring-rest/ex/foos


3. RequestMapping and HTTP Headers

3.1. @RequestMapping with the headers Attribute

The mapping can be narrowed even further by specifying a header for the request:


@RequestMapping(value = "/ex/foos", headers = "key=val", method = GET)
@ResponseBody
public String getFoosWithHeader() {
    return "Get some Foos with Header";
}
 
And even multiple headers via the header attribute of @RequestMapping:
 
@RequestMapping(
  value = "/ex/foos",
  headers = { "key1=val1", "key2=val2" }, method = GET)
@ResponseBody
public String getFoosWithHeaders() {
    return "Get some Foos with Header";
}
 
To test the operation, we’re going to use the curl header support:

 
curl -i -H "key:val" http://localhost:8080/spring-rest/ex/foos
 
 
Note that for the curl syntax for separating the header key and the header value is a colon, same as in the HTTP spec, while in Spring the equals sign is used.


3.2. @RequestMapping Consumes and Produces

Mapping media types produced by a controller method is worth special attention – we can map a request based on its Accept header via the @RequestMapping headers attribute introduced above:

@RequestMapping(
  value = "/ex/foos",
  method = GET,
  headers = "Accept=application/json")
@ResponseBody
public String getFoosAsJsonFromBrowser() {
    return "Get some Foos with Header Old";
}
 
 he matching for this way of defining the Accept header is flexible – it uses contains instead of equals, so a request such as the following would still map correctly:
 
curl -H "Accept:application/json,text/html"
  http://localhost:8080/spring-rest/ex/foos
 
 Starting with Spring 3.1, the @RequestMapping annotation now has the produces and the consumes attributes, specifically for this purpose:
 
 
@RequestMapping(
  value = "/ex/foos",
  method = RequestMethod.GET,
  produces = "application/json"
)
@ResponseBody
public String getFoosAsJsonFromREST() {
    return "Get some Foos with Header New";
}
 
 Also, the old type of mapping with the headers attribute will automatically be converted to the new produces mechanism starting with Spring 3.1, so the results will be identical.
This is consumed via curl in the same way:

curl -H "Accept:application/json"
  http://localhost:8080/spring-rest/ex/foos
 
 Additionally, produces support multiple values as well:
 
 
@RequestMapping(
  value = "/ex/foos",
  method = GET,
  produces = { "application/json", "application/xml" }
)
 
 Keep in mind that these – the old way and the new way of specifying the accept header – are basically the same mapping, so Spring won’t allow them together – having both these methods active would result in:
 
 
Caused by: java.lang.IllegalStateException: Ambiguous mapping found.
Cannot map 'fooController' bean method
java.lang.String
org.baeldung.spring.web.controller
  .FooController.getFoosAsJsonFromREST()
to
{ [/ex/foos],
  methods=[GET],params=[],headers=[],
  consumes=[],produces=[application/json],custom=[]
}:
There is already 'fooController' bean method
java.lang.String
org.baeldung.spring.web.controller
  .FooController.getFoosAsJsonFromBrowser()
mapped.
 
A final note on the new produces and consumes mechanism – these behave differently from most other annotations: when specified at the type level, the method level annotations do not complement but override the type level information.


4. RequestMapping with Path Variables

Parts of the mapping URI can be bound to variables via the @PathVariable annotation.

4.1. Single @PathVariable

A simple example with a single path variable:

@RequestMapping(value = "/ex/foos/{id}", method = GET)
@ResponseBody
public String getFoosBySimplePathWithPathVariable(
  @PathVariable("id") long id) {
    return "Get a specific Foo with id=" + id;
}
 

Note that @PathVariable benefits from automatic type conversion, so we could have also declared the id as:
 
 
@PathVariable long id


4.2. Multiple @PathVariable

More complex URI may need to map multiple parts of the URI to multiple values:

@RequestMapping(value = "/ex/foos/{fooid}/bar/{barid}", method = GET)
@ResponseBody
public String getFoosBySimplePathWithPathVariables
  (@PathVariable long fooid, @PathVariable long barid) {
    return "Get a specific Bar with id=" + barid +
      " from a Foo with id=" + fooid;
}
 
This is easily tested with a curl in the same way:
curl http://localhost:8080/spring-rest/ex/foos/1/bar/2


4.3. @PathVariable with RegEx

Regular expressions can also be used when mapping the @PathVariable; for example, we will restrict the mapping to only accept numerical values for the id:

@RequestMapping(value = "/ex/bars/{numericId:[\\d]+}", method = GET)
@ResponseBody
public String getBarsBySimplePathWithPathVariable(
  @PathVariable long numericId) {
    return "Get a specific Bar with id=" + numericId;
}
 
 
This will mean that the following URIs will match:
 
http://localhost:8080/spring-rest/ex/bars/1
 
 But this will not:
 
http://localhost:8080/spring-rest/ex/bars/abc


RequestMapping with Request Parameters

@RequestMapping allows easy mapping of URL parameters with the @RequestParam annotation.

We are now mapping a request to a URI such as:

http://localhost:8080/spring-rest/ex/bars?id=100


@RequestMapping(value = "/ex/bars", method = GET)
@ResponseBody
public String getBarBySimplePathWithRequestParam(
  @RequestParam("id") long id) {
    return "Get a specific Bar with id=" + id;
}
 
  We are then extracting the value of the id parameter using the @RequestParam(“id”) annotation in the controller method signature.
The send a request with the id parameter, we’ll use the parameter support in curl:
 
curl -i -d id=100 http://localhost:8080/spring-rest/ex/bars
 
 
In this example, the parameter was bound directly without having been declared first.
For more advanced scenarios, @RequestMapping can optionally define the parameters – as yet another way of narrowing the request mapping:


@RequestMapping(value = "/ex/bars", params = "id", method = GET)
@ResponseBody
public String getBarBySimplePathWithExplicitRequestParam(
  @RequestParam("id") long id) {
    return "Get a specific Bar with id=" + id;
}


 Even more flexible mappings are allowed – multiple params values can be set, and not all of them have to be used:


@RequestMapping(
  value = "/ex/bars",
  params = { "id", "second" },
  method = GET)
@ResponseBody
public String getBarBySimplePathWithExplicitRequestParams(
  @RequestParam("id") long id) {
    return "Narrow Get a specific Bar with id=" + id;
}
 
 
 And of course, a request to a URI such as:
 
 
http://localhost:8080/spring-rest/ex/bars?id=100&second=something
 
 
 Will always be mapped to the best match – which is the narrower match, which defines both the id and the second parameter.


6. RequestMapping Corner Cases

6.1. @RequestMapping – multiple paths mapped to the same controller method

Although a single @RequestMapping path value is usually used for a single controller method, this is just good practice, not a hard and fast rule – there are some cases where mapping multiple requests to the same method may be necessary. For that case, the value attribute of @RequestMapping does accept multiple mappings, not just a single one:
 

@RequestMapping(
  value = { "/ex/advanced/bars", "/ex/advanced/foos" },
  method = GET)
@ResponseBody
public String getFoosOrBarsByPath() {
    return "Advanced - Get some Foos or Bars";
}
 
 
 Now, both of these curl commands should hit the same method:
 
 
curl -i http://localhost:8080/spring-rest/ex/advanced/foos
curl -i http://localhost:8080/spring-rest/ex/advanced/bars


6.2. @RequestMapping – multiple HTTP request methods to the same controller method

Multiple requests using different HTTP verbs can be mapped to the same controller method:


@RequestMapping(
  value = "/ex/foos/multiple",
  method = { RequestMethod.PUT, RequestMethod.POST }
)
@ResponseBody
public String putAndPostFoos() {
    return "Advanced - PUT and POST within single method";
}
 
 
 With curl, both of these will now hit the same method:
 
  curl -i -X POST http://localhost:8080/spring-rest/ex/foos/multiple
 curl -i -X PUT http://localhost:8080/spring-rest/ex/foos/multiple


6.3. @RequestMapping – a fallback for all requests

To implement a simple fallback for all requests using a particular HTTP method – for example, for a GET:
 
 
@RequestMapping(value = "*", method = RequestMethod.GET)
@ResponseBody
public String getFallback() {
    return "Fallback for GET Requests";
}
 
 Or even for all requests:
 

@RequestMapping(
  value = "*",
  method = { RequestMethod.GET, RequestMethod.POST ... })
@ResponseBody
public String allFallback() {
    return "Fallback for All Requests";
}


7. New Request Mapping Shortcuts

Spring Framework 4.3 introduced a few new HTTP mapping annotations, all based on @RequestMapping:
  • @GetMapping
  • @PostMapping
  • @PutMapping
  • @DeleteMapping
  • @PatchMapping
These new annotations can improve the readability and reduce the verbosity of the code. Let us look at these new annotations in action by creating a RESTful API that supports CRUD operations:


@GetMapping("/{id}")
public ResponseEntity getBazz(@PathVariable String id){
    return new ResponseEntity<>(new Bazz(id, "Bazz"+id), HttpStatus.OK);
}
 
@PostMapping
public ResponseEntity newBazz(@RequestParam("name") String name){
    return new ResponseEntity<>(new Bazz("5", name), HttpStatus.OK);
}
 
@PutMapping("/{id}")
public ResponseEntity updateBazz(
  @PathVariable String id,
  @RequestParam("name") String name) {
    return new ResponseEntity<>(new Bazz(id, name), HttpStatus.OK);
}
 
@DeleteMapping("/{id}")
public ResponseEntity deleteBazz(@PathVariable String id){
    return new ResponseEntity<>(new Bazz(id), HttpStatus.OK);
}


8. Spring Configuration

The Spring MVC Configuration is simple enough – considering that our FooController is defined in the following package:

package org.baeldung.spring.web.controller;
 
@Controller
public class FooController { ... }
 
 
We simply need a @Configuration class to enable the full MVC support and configure classpath scanning for the controller:


@Configuration
@EnableWebMvc
@ComponentScan({ "org.baeldung.spring.web.controller" })
public class MvcConfig {
    //
}


Practicing with IntelliJ and Git

This exercise is a straightforward recipe for starting a new IntelliJ project, adding a code file, and marrying a local Git repository to a remote GitHub repository. Even if you are comfortable with your Git workflow, you should go through this and understand what is happening - and more specifically, where on your computer's hard drive and on GitHub it is happening.
Repeat this exercise a few times, until you're comfortable. You don't have to memorize each command - that's what cheat sheets are for! - but rather, focus on understanding their relationships to the files on your computer, your development environment (IntelliJ), and GitHub.

Create a new IntelliJ project.

First, open IntelliJ and create a new project on your desktop. We'll delete it after the exercise. Name it Practice01, Practice02, and so on, as you repeat this exercise. The "root" folder of this project will therefore be /Users/yourname/Desktop/Practice01, or using the ~ "home" shortcut, ~/Desktop/Practice01.

Make a new Java class file.

In the Project Structure panel, right-click on the src folder and create a new java class.

The contents of this file aren't important, but we want to practice adding files to your repository. Just copy and paste the contents of one of your Java exercises into the new file. You can run your code if you like, to ensure that it compiles. Git doesn't care if your code works, but it's good practice to only commit functional code.

Save the file and close IntelliJ.


Initialize Git within your project folder.

Open your Terminal. Use cd to navigate into the IntelliJ project your just created:

cd ~/Desktop/Practice01.

Then, initialize Git in this folder.
 
git init

Let's make sure that worked.
 
git status

You should see a list of "untracked files", including IntelliJ's project structure, and your code files. If you ran your code, you will also see an out/ directory and a .class file. Don't add or commit anything yet!

Add a .gitignore.

A .gitignore is a file that Git understands. It is "hidden" (files beginning with a period are not shown in Finder windows, but you can list them from Terminal using ls -a). It is important for keeping your repository organized. Any files or directories you name in .gitignore, Git will avoid adding to your repository and won't show as untracked files. Create this file in the root of your new project folder:
touch .gitignore
open .gitignore
Type the following lines into it.
.DS_Store
out/
*.class
Why these? .DS_Store is a hidden Mac file that contains settings for each folder, like how icons are positioned. This is irrelevant to IntelliJ or your Java code, so it has no place in your repository. out/ and .class files are compiled binaries, which are generated freshly every time you Run your code, so there's no reason to store them, either.

Another hidden folder you may have noticed is .idea. This contains IntelliJ settings for your project. These files DO belong in version control, especially as your projects grow and become more complex, so we aren't ignoring them.
Save your new .gitignore. Now, do git status again. You'll still see untracked files, but the ignored ones aren't listed anymore.

Add and commit.

Now we're going to make the first commit to this repository. Add all the files in this folder with the following command:

git add .

Do git status again. (Seeing a pattern? git status is our eyes, letting us visualize what's currently going on in the repository.) All the untracked files now show up under "Changes to be committed". You haven't committed yet - this step is called "staging" and lets you review before completing the commit.

git commit -m "First commit in my Practice01 repository"

Git requires that you type a message to describe each commit. It is good practice to be descriptive. If you need to go back to a previous commit, these descriptions will be very valuable for telling your commits apart.

Let's make a change to the Java code file. Reopen your IntelliJ project and open your Java file.
Add a comment to the file: // This is a test comment. I'm practicing with Git!
Save and go back to your Terminal. git status again. The file you changed is now listed under "Changes not staged for commit". Let's stage it with git add:
 
git add MyFile.java

Then make your second commit.
 
git commit -m "This is my second commit, just a simple comment."

Git will respond with, 1 file changed, 1 insertion(+). Git can see the difference between your updated file and its previous version, and gives you a summary of the change.
You've made two commits to your local repository. Now it's time to get GitHub in on the action.

Create a new GitHub repository.

Open a browser and go to your GitHub profile. Click on the "Repositories" tab, and then the green "New" button in the upper right.
Name your Git repository the same name (Practice01, etc) as you gave your IntelliJ project above. In your real work, projects and repositories may not always have the same name, but they usually do to minimize confusion.
For the purposes of this tutorial, don't check "Initialize this repository with a README". Create the repository. From the "Quick setup" screen that follows, copy the "SSH" URL to your clipboard, which looks like:
git@github.com:/Practice01.git

Add remote and push

Return to Terminal and type:

git remote add origin 

Your local Git repository is now connected to GitHub. Time to push your commits.
 
git push origin master

Refresh the page in your browser and see that GitHub has received your project.
Who's awesome? You're awesome!

Delete your working directory

Let's play with your new superpower of having all your code mirrored online. Delete your project directory, the Practice01 folder, from your desktop. Yup, just drag to the Trash and empty that bad boy. Your code is safe in GitHub.

Clone from GitHub

In Terminal, cd ~/Desktop.
Don't create a new folder, Git will do that for you. Just clone using the same URL you copied earlier:
 
git clone 

GitHub will create Practice01 and copy your repository over. Use ls and git status to see that your files are present and the repository is active. Git will respond:
 
On branch master 
 
nothing to commit, working directory clean

You don't have to git init again - cloning re-initializes everything just as it was since your last push.

Error Handling for REST with Spring

1. Overview

This article will illustrate how to implement Exception Handling with Spring for a REST API. We’ll look at both the recommended solution with Spring 3.2 and 4.x but also at the older options as well.

Before Spring 3.2, the two main approaches to handling exceptions in a Spring MVC application were: HandlerExceptionResolver or the @ExceptionHandler annotation. Both of these have some clear downsides.
After 3.2 we now have the new @ControllerAdvice annotation to address the limitations of the previous two solutions.
All of these do have one thing in common – they deal with the separation of concerns very well. The app can throw exception normally to indicate a failure of some kind – exceptions which will then be handled separately.

2. Solution 1 – The Controller level @ExceptionHandler

The first solution works at the @Controller level – we will define a method to handle exceptions, and annotate that with @ExceptionHandler:

public class FooController{
     
    //...
    @ExceptionHandler({ CustomException1.class, CustomException2.class })
    public void handleException() {
        //
    }
}
 
 This approach has a major drawback – the @ExceptionHandler annotated method is only active for that particular Controller, not globally for the entire application. Of course adding this to every controller makes it not well suited for a general exception handling mechanism.
The limitation is often worked around by having all Controllers extend a Base Controller class – however, this can be a problem for applications where, for whatever reasons, the Controllers cannot be made to extend from such a class. For example, the Controllers may already extend from another base class which may be in another jar or not directly modifiable, or may themselves not be directly modifiable.
Next, we’ll look at another way to solve the exception handling problem – one that is global and does not include any changes to existing artifacts such as Controllers.


3. Solution 2 – The HandlerExceptionResolver

The second solution is to define an HandlerExceptionResolver – this will resolve any exception thrown by the application. It will also allow us to implement a uniform exception handling mechanism in our REST API.
Before going for a custom resolver, let’s go over the existing implementations.

3.1. ExceptionHandlerExceptionResolver

This resolver was introduced in Spring 3.1 and is enabled by default in the DispatcherServlet. This is actually the core component of how the @ExceptionHandler mechanism presented earlier works.

3.2. DefaultHandlerExceptionResolver

This resolver was introduced in Spring 3.0 and is enabled by default in the DispatcherServlet. It is used to resolve standard Spring exceptions to their corresponding HTTP Status Codes, namely Client error – 4xx and Server error – 5xx status codes. Here is the full list of the Spring Exceptions it handles, and how these are mapped to status codes.
While it does set the Status Code of the Response properly, one limitation is that it doesn’t set anything to the body of the Response. And for a REST API – the Status Code is really not enough information to present to the Client – the response has to have a body as well, to allow the application to give additional information about the failure.
This can be solved by configuring View resolution and rendering error content through ModelAndView, but the solution is clearly not optimal – which is why a better option has been made available with Spring 3.2 – we’ll talk about that in the latter part of this article.

3.3. ResponseStatusExceptionResolver

This resolver was also introduced in Spring 3.0 and is enabled by default in the DispatcherServlet. Its main responsibility is to use the @ResponseStatus annotation available on custom exceptions and to map these exceptions to HTTP status codes.
Such a custom exception may look like:

 ResponseStatus(value = HttpStatus.NOT_FOUND)

publi class ResourceNotFoundException extends RuntimeException {
    public ResourceNotFoundException() {
        super();
    }
    public ResourceNotFoundException(String message, Throwable cause) {
        super(message, cause);
    }
    public ResourceNotFoundException(String message) {
        super(message);
    }
    public ResourceNotFoundException(Throwable cause) {
        super(cause);
    }
}
 
 Same as the DefaultHandlerExceptionResolver, this resolver is limited in the way it deals with the body of the response – it does map the Status Code on the response, but the body is still null.

3.4. SimpleMappingExceptionResolver and AnnotationMethodHandlerExceptionResolver

The SimpleMappingExceptionResolver has been around for quite some time – it comes out of the older Spring MVC model and is not very relevant for a REST Service. It is used to map exception class names to view names.
The AnnotationMethodHandlerExceptionResolver was introduced in Spring 3.0 to handle exceptions through the @ExceptionHandler annotation but has been deprecated by ExceptionHandlerExceptionResolver as of Spring 3.2.

3.5. Custom HandlerExceptionResolver

The combination of DefaultHandlerExceptionResolver and ResponseStatusExceptionResolver goes a long way towards providing a good error handling mechanism for a Spring RESTful Service. The downside is – as mentioned before – no control over the body of the response.
Ideally, we’d like to be able to output either JSON or XML, depending on what format the client has asked for (via the Accept header).

This alone justifies creating a new, custom exception resolver:

@Component
public class RestResponseStatusExceptionResolver extends AbstractHandlerExceptionResolver {

    @Override
    protected ModelAndView doResolveException
      (HttpServletRequest request, HttpServletResponse response, Object handler, Exception ex) {
        try {
            if (ex instanceof IllegalArgumentException) {
                return handleIllegalArgument((IllegalArgumentException) ex, response, handler);
            }
            ...
        } catch (Exception handlerException) {
            logger.warn("Handling of [" + ex.getClass().getName() + "]
              resulted in Exception", handlerException);
        }
        return null;
    }

    private ModelAndView handleIllegalArgument
      (IllegalArgumentException ex, HttpServletResponse response) throws IOException {
        response.sendError(HttpServletResponse.SC_CONFLICT);
        String accept = request.getHeader(HttpHeaders.ACCEPT);
        ...
        return new ModelAndView();
    }
}

One detail to notice here is the Request itself is available, so the application can consider the value of the Accept header sent by the client. For example, if the client asks for application/json then, in the case of an error condition, the application should still return a response body encoded with application/json.
The other important implementation detail is that a ModelAndView is returned – this is the body of the response and it will allow the application to set whatever is necessary on it.
This approach is a consistent and easily configurable mechanism for the error handling of a Spring REST Service. It does however have limitations: it’s interacting with the low-level HtttpServletResponse and it fits into the old MVC model which uses ModelAndView – so there’s still room for improvement.


4. New Solution 3 – The New @ControllerAdvice (Spring 3.2 And Above)

Spring 3.2 brings support for a global @ExceptionHandler with the new @ControllerAdvice annotation. This enables a mechanism that breaks away from the older MVC model and makes use of ResponseEntity along with the type safety and flexibility of @ExceptionHandler:
 
@ControllerAdvice
public class RestResponseEntityExceptionHandler extends ResponseEntityExceptionHandler {
 
    @ExceptionHandler(value = { IllegalArgumentException.class, IllegalStateException.class })
    protected ResponseEntity handleConflict(RuntimeException ex, WebRequest request) {
        String bodyOfResponse = "This should be application specific";
        return handleExceptionInternal(ex, bodyOfResponse,
          new HttpHeaders(), HttpStatus.CONFLICT, request);
    }
}
 
 
The new annotation allows the multiple scattered @ExceptionHandler from before to be consolidated into a single, global error handling component.
The actual mechanism is extremely simple but also very flexible:
  • it allows full control over the body of the response as well as the status code
  • it allows mapping of several exceptions to the same method, to be handled together
  • it makes good use of the newer RESTful ResposeEntity response
One thing to keep in mind here is to match the exceptions declared with @ExceptionHandler with the exception used as the argument of the method. If these don’t match, the compiler will not complain – no reason it should, and Spring will not complain either.
However, when the exception is actually thrown at runtime, the exception resolving mechanism will fail with:
 
java.lang.IllegalStateException: No suitable resolver for argument [0] [type=...]
HandlerMethod details: ...


5. Handle the Access Denied in Spring Security

The Access Denied occurs when an authenticated user tries to access resources that he doesn’t have enough authorities to access.

5.1. MVC – Custom Error Page

First, let’s look at the MVC style of the solution and see how to customize an error page for Access Denied:
The XML configuration:
 
<http>
    <intercept-url pattern="/admin/*" access="hasAnyRole('ROLE_ADMIN')"/>  
    ...
    <access-denied-handler error-page="/my-error-page" />
</http>
 

 And the Java configuration:

 @Override

protected void configure(HttpSecurity http) throws Exception {
    http.authorizeRequests()
        .antMatchers("/admin/*").hasAnyRole("ROLE_ADMIN")
        ...
        .and()
        .exceptionHandling().accessDeniedPage("/my-error-page");
}

 When users try to access a resource without having enough authorities, they will be redirected to “/my-error-page“.


5.2. Custom AccessDeniedHandler

Next, let’s see how to write our custom AccessDeniedHandler:

@Component
public class CustomAccessDeniedHandler implements AccessDeniedHandler {

    @Override
    public void handle
      (HttpServletRequest request, HttpServletResponse response, AccessDeniedException ex)
      throws IOException, ServletException {
        response.sendRedirect("/my-error-page");
    }
}

 And now let’s configure it using XML Configuration:
 
<http>
    <intercept-url pattern="/admin/*" access="hasAnyRole('ROLE_ADMIN')"/>
    ...
    <access-denied-handler ref="customAccessDeniedHandler" />
</http>

Or using Java Configuration:
 
@Autowired
private CustomAccessDeniedHandler accessDeniedHandler;
 
@Override
protected void configure(HttpSecurity http) throws Exception {
    http.authorizeRequests()
        .antMatchers("/admin/*").hasAnyRole("ROLE_ADMIN")
        ...
        .and()
        .exceptionHandling().accessDeniedHandler(accessDeniedHandler)
}
 
 Note how – in our CustomAccessDeniedHandler, we can customize the response as we wish by redirecting or display a custom error message.:)
 

5.3. REST and Method Level Security

Finally, let’s see how to handle method level security @PreAuthorize, @PostAuthorize, and @Secure Access Denied.
We’ll, of course, use the global exception handling mechanism that we discussed earlier to handle the new AccessDeniedException as well:

@ControllerAdvice
public class RestResponseEntityExceptionHandler extends ResponseEntityExceptionHandler {
 
    @ExceptionHandler({ AccessDeniedException.class })
    public ResponseEntity handleAccessDeniedException(Exception ex, WebRequest request) {
        return new ResponseEntity(
          "Access denied message here", new HttpHeaders(), HttpStatus.FORBIDDEN);
    }
     
    ...
}


10/08/2013

Objective-C Design Pattern

Please look at the http://www.oodesign.com/

Creational Patterns
*Abstract Factory
Creates an instance of several families of classes *
NSObject Objective-C class methods are sometimes call factory methods. This pattern is intrinsic to the Objective-C language. Every Objective C class is potentially an abstract factory. This pattern is also used to implement CocoaClassClustersSubClass">ShouldClassClusterPlaceholderBeASubClasshttp://developer.apple.com/documentation/Cocoa/Conceptual/DesignPatterns">CocoaDesignPatterns/index.html
*Builder Separates object construction from its representation *
NSDocumentManager? � Builds NSDocument instances with NSWindowManager(s), handles recent documents menu, builds document related responder chain� NSApplication? � Builds main menu, initial responder chain, run loop�
*Factory Method Creates an instance of several derived classes *
Objective-C class methods are sometimes call factory methods. This pattern is intrinsic to the Objective-C language. NSObject ClassClustersSubClass">ShouldClassClusterPlaceholderBeASubClasshttp://developer.apple.com/documentation/Cocoa/Conceptual/MemoryMgmt/index.html
*Prototype A fully initialized instance to be copied or cloned *
NSCell is a Prototype when used with NSMatrix.
*Singleton A class of which only a single instance can exist *
SingletonDesignPattern SingletonAlternatives NSApplication NSNull NSFileManager NSWorkspace http://developer.apple.com/documentation/Cocoa/Conceptual/DesignPatterns">CocoaDesignPatterns/index.html http://developer.apple.com/documentation/Cocoa/Conceptual/CocoaObjects/Articles/CreateSingleton.html http://developer.apple.com/documentation/Cocoa/Conceptual/CocoaObjects/Articles/ObjectCreation.html
Structural Patterns
*Adapter Match interfaces of different classes *
http://developer.apple.com/documentation/Cocoa/Conceptual/DesignPatterns">CocoaDesignPatterns/index.html
*Bridge Separates an object�s interface from its implementation *
*Composite A tree structure of simple and composite objects *
http://developer.apple.com/documentation/Cocoa/Conceptual/DesignPatterns">CocoaDesignPatterns/index.htmlWrappingIsBad
*Decorator Add responsibilities to objects dynamically *
http://developer.apple.com/documentation/Cocoa/Conceptual/DesignPatterns">CocoaDesignPatterns/index.html
*Facade A single class that represents an entire subsystem *
NSImage - NSText and NSTextView encapsulate the functionality of complex text layout and editing which is internally implement with NSTextStorage, NSLayoutManager, and other classes.
http://developer.apple.com/documentation/Cocoa/Conceptual/DesignPatterns">CocoaDesignPatterns/index.html
*Flyweight A fine-grained instance used for efficient sharing * NSCell
*Proxy An object representing another object *
http://developer.apple.com/documentation/Cocoa/Conceptual/DesignPatterns">CocoaDesignPatterns/index.html
Behavioral Patterns
*Chain of Resp. A way of passing a request between a chain of objects *
http://developer.apple.com/documentation/Cocoa/Conceptual/DesignPatterns">CocoaDesignPatterns/index.html
*Command Encapsulate a command request as an object *
http://developer.apple.com/documentation/Cocoa/Conceptual/DesignPatterns">CocoaDesignPatterns/index.html
*Interpreter A way to include language elements in a program *
Value Transformers?
*Iterator Sequentially access the elements of a collection *
NSEnumerator http://developer.apple.com/documentation/Cocoa/Conceptual/DesignPatterns">CocoaDesignPatterns/index.html
*Mediator Defines simplified communication between classes *
NSObjectController, NSArrayController, NSTreeController, and NSUserDefaultsController http://developer.apple.com/documentation/Cocoa/Conceptual/DesignPatterns">CocoaDesignPatterns/index.html
*Memento Capture and restore an object's internal state *
NSCoder NSKeyedArchiver and NSKeyUnarchiver http://developer.apple.com/documentation/Cocoa/Conceptual/DesignPatterns">CocoaDesignPatterns/index.html
*Observer A way of notifying change to a number of classes *
NSNotificationCenterhttp://developer.apple.com/documentation/Cocoa/Conceptual/DesignPatterns">CocoaDesignPatterns/index.html
*State Alter an object's behavior when its state changes *
*Strategy Encapsulates an algorithm inside a class *
NSLayoutMananger NSFormatter?
*TemplateMethod Defer the exact steps of an algorithm to a subclass *
http://developer.apple.com/documentation/Cocoa/Conceptual/DesignPatterns">CocoaDesignPatterns/index.html
*Visitor Defines a new operation to a class without change *
Cocoa Unique Patterns
*Target/Action A variation/simplification of the Command pattern *
NSControl NSActionCell @selector Similar to Qt Signals & Slots
*Method Swizzling A technique for runtime modification of the relationship between message selectors and the implementation that will be called in response to a message *
*Delegation Enable one object to control, modify, or specialize the behavior of another object through a loosely coupled interface.

PHP Job Interview Questions

PHP Design Patterns 

As a PHP contractor, consultant, and freelancer I've had a fair number of interviews - and sometimes I have been asked technical questions. Here are a few to help you prepare for your next PHP job interview.


=,==,=== - what is the difference between these?
= assigns a value, == checks if value is the same, === checks if value is the same and the variables are of the exact same type.


Echo, print, printf - what is the difference between these?
Print and echo both output what is passed to them. Print acts like a function, so you can use it in complex statements. Printf is used to format the output.


Include, include once, require - what is the difference between these?
Include will includes a file each time it is called. Include_once would only include a file one time, so if a php program has a file in two include_once statements only the first will be done. Requre is like include, but if the file included is not available a fatal error occurs and processing stops.


Are variables passed to functions by reference or value?
A variable is passed by value unless the variable is passed with an &, such as functionName(&$variableName)


How do you encrypt data?
The PHP crypt() function can be used to encrypt data. The PHP md5() function is very pretty widely used, but is a one way hash, and can not be decrypted. (Honestly, the one time I had this question I drew a complete blank, so I'm not exactly certain what they were looking for.)


What editor or ide do you use?
Interesting question, probably does say something about your programming capabilites. I use Eclipse with PHP extensions, and interviewers seem to like that. There are probably others such as Zend Studio that are also excellent answers. Serious Unix users would be good with vi or emacs.


PHP Statics, what are they and how do you use them?
As with Java, if the job is for OO PHP (that is PHP 5), there will be a question on PHP static variables. You may be asked how to reference a static from inside and outside of the class it is in, or just show that you get the basic concept of a variable or function that is for the whole class and not an instance.


Design Patterns general questions
Now we are really into OO stuff. As in java job interviews I've usually been asked about design patterns in fairly vague terms, such as "describe the design patterns used in the systems you have worked on". I was asked that so much that I drew out some UML to bring with me to interviews, as I found drawing up the UML during the interview to be distracting and slow.

Java Pattern / PHP Patterns

Please look at the http://www.oodesign.com/


Java Design Patterns

Abstract Factory == Sets of methods to make various objects.
Builder = Make and return one object various ways.
Factory Method = Methods to make and return components of one object various ways.
Prototype = Make new objects by cloning the objects which you set as prototypes.
Singleton = A class distributes the only instance of itself.
Adapter = A class extends another class, takes in an object, and makes the taken object behave like the extended class.
Bridge = An abstraction and implementation are in different class hierarchies.
Composite = Assemble groups of objects with the same signature.
Decorator = One class takes in another class, both of which extend the same abstract class, and adds functionality.
Facade =  One class has a method that performs a complex process calling several other classes.
Flyweight = The reusable and variable parts of a class are broken into two classes to save resources.
Proxy =  One class controls the creation of and access to objects in another class.
Chain Of Responsibility = A method called in one class can move up a hierarchy to find an object that can properly execute the method.
Command = An object encapsulates everything needed to execute a method in another object.
Interpreter = Define a macro language and syntax, parsing input into objects which perform the correct opertaions.
Iterator = One object can traverse the elements of another object.
Mediator = An object distributes communication between two or more objects.
Memento = One object stores another objects state.
Observer = An object notifies other object(s) if it changes.
State = An object appears to change its` class when the class it passes calls through to switches itself for a related class.
Strategy = An object controls which of a family of methods is called. Each method is in its` own class that extends a common base class.
Template = An abstract class defines various methods, and has one non-overridden method which calls the various methods.
Visitor = One or more related classes have the same method, which calls a method specific for themselves in another class.


PHP Design Patterns

Creational Patterns

Abstract Factory = Sets of methods to make various objects.
Builder = Make and return one object various ways.
Factory Method M= ethods to make and return components of one object various ways.
Prototype = Make new objects by cloning the objects which you set as prototypes.
Singleton = A class distributes the only instance of itself.

Structural Patterns

Adapter = A class extends another class, takes in an object, and makes the taken object behave like the extended class.
Bridge = An abstraction and implementation are in different class hierarchies.
Composite = Assemble groups of objects with the same signature.
Decorator = One class takes in another class, both of which extend the same abstract class, and adds functionality.
Facade = One class has a method that performs a complex process calling several other classes.
Flyweight = The reusable and variable parts of a class are broken into two classes to save resources.
Proxy = One class controls the creation of and access to objects in another class.

Behavorial Patterns

Chain Of Responsibility = A method called in one class can move up a hierarchy to find an object that can properly execute the method.
Command = An object encapsulates everything needed to execute a method in another object.
Interpreter = Define a macro language and syntax, parsing input into objects which perform the correct opertaions.
Iterator = One object can traverse the elements of another object.
Mediator = An object distributes communication between two or more objects.
Memento = One object stores another objects state.
Observer = An object notifies other object(s) if it changes.
State = An object appears to change its` class when the class it passes calls through to switches itself for a related class.
Strategy = An object controls which of a family of methods is called. Each method is in its` own class that extends a common base class.
Template =An abstract class defines various methods, and has one non-overridden method which calls the various methods.
Visitor = One or more related classes have the same method, which calls a method specific for themselves in another class.

1/23/2013

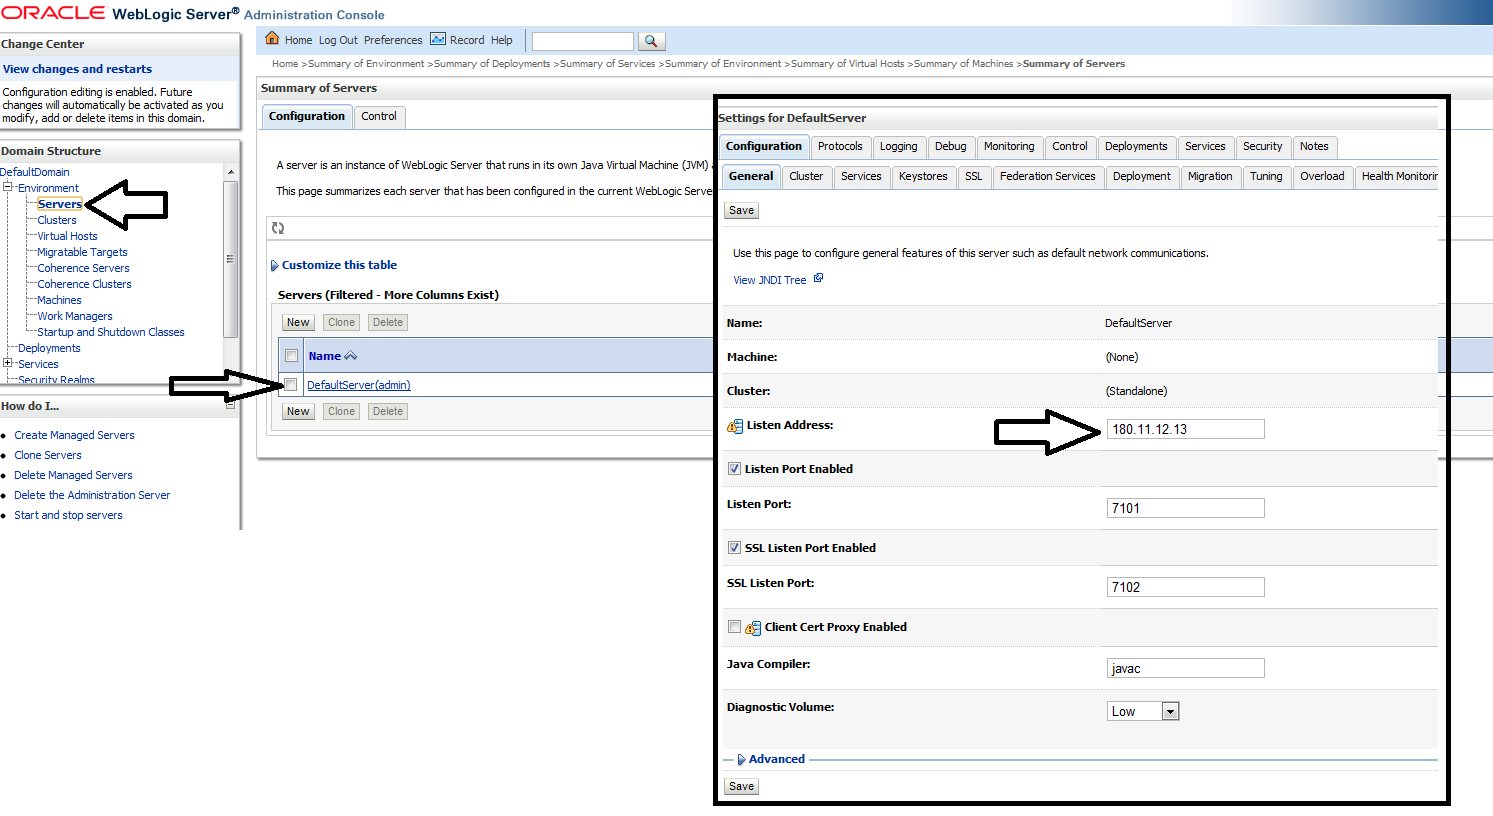
When we change the IP of the Weblogic server affect the ADF applications deployment


After we change the IP of the local Weblogic server, from default (127.0.0.1) to another IP (ex:180.11.12.13) we get an error at the deployment of the ADF applications.

How to resolve this impediment:
 go to to JDeveloper -> View -> Aplication Server Navigator -> ->right click on the server->Properties->Configuration tab-> Enter your IP in Weblogic Hostname field (ex:180.11.12.13).


Re-start your server and deploy your ADF applications.
Now you can share your app running at your machine with anyone with the app-url http://180.11.12.13:7101/AppDemo...


8/20/2012

OOP

OOPs stands for Object oriented Programming. Previously we used to follow the procedural programming paradigm while developing the software which makes it hard to add the new functionality at the maintenance phases. Even it was harder to test the module in the procedurally developed code because the coded modules were so tightly coupled. Even there was not even any chance to reuse the existing modules to decrease the coding efforts. Then there came the concept of the

Object Oriented Programming which was totally based on the real life entities and scenerios. OOPs enables to program the real world objects and easily play with them in our application development scenerios. OOPs focuses on the relevant data of the real world object and forces to concentrate on the various functionalities effecting the states of the data.

OOPs revolve around the four concepts:
1. Encapsulation
2. Polymorphism
3. Abstraction
4. Inheritance

In OOPs, these concepts are implemented through a class definition and achieved through the object creation process, programmatically.

TESTING QA

http://www.scribd.com/doc/103368273/Foundations-of-Software-Testing-Istqb-Certification-9781844803552-31736

FOUNDATIONS OF SOFTWARETESTING
 
ISTQB CERTIFICATION
 
Dorothy GrahamErik van VeenendaalIsabel EvansRex Black
 

Database Persistence and Flyway in Quarkus

Database Persistence and Flyway in Quarkus  Building a Production-Ready Product Management System with PostgreSQL Introduction In ...