10/31/2024

Deploying Flink jobs in production using the Flink Kubernetes operator: Part 1


As stream processing is on the rise, it is not uncommon for organizations to write hundreds of Flink jobs to cater to their business needs. Since Flink jobs have great diversity in their configuration, data processing scale, and resourcing needs, a reliable and consistent deployment strategy across all the jobs is ideal. This post is the first of the two articles where we will discuss deploying the Flink Kubernetes Operator itself. The following post can then build up on this one and talk about deploying Flink jobs using Flink Operator.

Diogo Santos has an amazing article introducing Flink Kubernetes Operator and a hands-on guide. 

This is a great first read if you are new to Flink or Flink Kubernetes Operator.


Helm or not to Helm?

The official recommendation is to use helm to deploy Flink Operator on your K8s cluster. 

In most cases, this works fine but there could be cases where you might need to go a manual route.

If you are integrating the deployment with your organization’s CICD framework which does not support helm.If you need to customize your operator deployment, for example, to allow for a Prometheus sidecar. Since this article is targeting a production-level deployment for Flink Operator, it makes sense to add support for a Prometheus sidecar. This is to allow for capturing Flink operator metrics and also to serve as a reference for adding any sidecar as per your need.


Gathering pieces

We need to collect all the artifacts which would allow us to bypass using helm and manually deploy them after customizing them as per our needs. A good starting point would be downloading the Flink Operator artifacts from its official release page.

 
C;\projects> git clone  https://github.com/apache/flink-kubernetes-operator.git


You might be delighted after taking a look at helm/flink-kubernetes-operator and identifying the pieces that form the entirety of Flink Operator deployment. If it is still overwhelming, do not worry, we will see how to use the artifacts.


Customize and Deploy
Let’s customize and deploy the artifacts one by one. The notable ones are:
  • service accounts and roles.
  • flinkdeployments and flinksessionjob CRDs.
  • flink-conf.yaml which contains configurations for the Flink operator.
  • flink-operator.yaml, which is the deployment spec for the Flink operator itself.
  • SAs and Roles for Flink Operator
Flink Operator uses role-based access control to manage the flinkdeployments, and create and manage the JobManager deployment, services, and config map, among others. We will create a role.yaml and sa.yaml.


role.yaml

---
apiVersion: v1
kind: ServiceAccount
metadata:
name: flinkoperator
namespace: flinkoperator
labels:
deploy.artifact.io/name: 'flinkoperator'


sa.yaml
---
apiVersion: rbac.authorization.k8s.io/v1
kind: ClusterRole
metadata:
name: flinkoperator
namespace: flinkoperator
labels:
deploy.artifact.io/name: 'flinkoperator'
rules:
- apiGroups:
- ""
resources:
- pods
- services
- events
- configmaps
- secrets
verbs:
- "*"
- apiGroups:
- apps
resources:
- deployments
- deployments/finalizers
- replicasets
verbs:
- "*"
- apiGroups:
- extensions
resources:
- deployments
- ingresses
verbs:
- "*"
- apiGroups:
- flink.apache.org
resources:
- flinkdeployments
- flinkdeployments/status
- flinksessionjobs
- flinksessionjobs/status
verbs:
- "*"
- apiGroups:
- networking.k8s.io
resources:
- ingresses
verbs:
- "*"
- apiGroups:
- coordination.k8s.io
resources:
- leases
verbs:
- "*"
---
apiVersion: rbac.authorization.k8s.io/v1
kind: ClusterRoleBinding
metadata:
name: flinkoperator
namespace: flinkoperator
labels:
deploy.artifact.io/name: 'flinkoperator'
roleRef:
kind: ClusterRole
name: flinkoperator
apiGroup: rbac.authorization.k8s.io
subjects:
- kind: ServiceAccount
name: flinkoperator
namespace: flinkoperator


kubectl apply --filename sa.yaml -n flinkoperator
kubectl apply --filename role.yaml -n flinkoperator


CRDs
CRDs should not be customized and be deployed as it is.

kubectl replace --filename helm/flink-kubernetes-operator/crds/flinkdeployments.flink.apache.org-v1.yml -n flinkoperator
kubectl replace --filename helm/flink-kubernetes-operator/crds/flinksessionjobs.flink.apache.org-v1.yml -n flinkoperator

Flink config
We will create a config map configmap.yaml and merge the flink config and logging
configs together. Note that log4j-console.properties affects logging related to
job and user code whereas log4j-operator.properties affects Flink Operator logs.


10/30/2024

Minikube start

Question: What is minikube?

Answer: minikube is local Kubernetes, focusing on making it easy to learn and develop for Kubernetes.

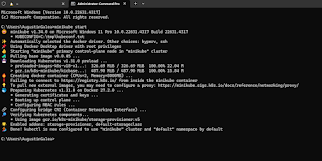
All you need is Docker (or similarly compatible) container or a Virtual Machine environment, and Kubernetes is a single command away: minikube start


What you’ll need :

  • 2 CPUs or more
  • 2GB of free memory
  • 20GB of free disk space
  • Internet connection
  • Container or virtual machine manager, such as: Docker, QEMU, Hyperkit, Hyper-V, KVM, Parallels, Podman, VirtualBox, or VMware Fusion/Workstation

1.Installation

.Easy path is the installation on Windows by using Windows Package Manager:

winget install Kubernetes.minikube

Other ways to install are described here: minikube 


2. Start your cluster

From a terminal with administrator access (but not logged in as root), run:

minikube start


If minikube fails to start, see the drivers page for help setting up a compatible container or virtual-machine manager.


3.Interact with your cluster

If you already have kubectl installed (see documentation), you can now use it to access your shiny new cluster:


    kubectl get po -A


Alternatively, minikube can download the appropriate version of kubectl and you should be able to use it like this:

        minikube kubectl -- get po -A


You can also make your life easier by adding the following to your shell config: (for more details see: kubectl)


        alias kubectl="minikube kubectl --"


Initially, some services such as the storage-provisioner, may not yet be in a Running state. This is a normal condition during cluster bring-up, and will resolve itself momentarily. For additional insight into your cluster state, minikube bundles the Kubernetes Dashboard, allowing you to get easily acclimated to your new environment:


        minikube dashboard


4. Deploy applications

4.1 Service

Create a sample deployment and expose it on port 8080:

        kubectl create deployment hello-minikube --image=kicbase/echo-server:1.0

        kubectl expose deployment hello-minikube --type=NodePort --port=8080

It may take a moment, but your deployment will soon show up when you run:

        kubectl get services hello-minikube
The easiest way to access this service is to let minikube launch a web browser for you:

        minikube service hello-minikube
Alternatively, use kubectl to forward the port:

        kubectl port-forward service/hello-minikube 7080:8080
Tada! Your application is now available at http://localhost:7080/.

You should be able to see the request metadata in the application output. Try changing the path of the request and observe the changes. Similarly, you can do a POST request and observe the body show up in the output.


4.2 Load Balancer
To access a LoadBalancer deployment, use the “minikube tunnel” command. Here is an example deployment:

        kubectl create deployment balanced --image=kicbase/echo-server:1.0
        
        kubectl expose deployment balanced --type=LoadBalancer --port=8080

In another window, start the tunnel to create a routable IP for the ‘balanced’ deployment:

        minikube tunnel

To find the routable IP, run this command and examine the EXTERNAL-IP column:

        kubectl get services balanced

Your deployment is now available at <EXTERNAL-IP>:8080

4.3 Ingress 
Enable ingress addon:

        minikube addons enable ingress

The following example creates simple echo-server services and an Ingress object to route to these services.

kind: Pod
apiVersion: v1
metadata:
  name: foo-app
  labels:
    app: foo
spec:
  containers:
    - name: foo-app
      image: 'kicbase/echo-server:1.0'
---
kind: Service
apiVersion: v1
metadata:
  name: foo-service
spec:
  selector:
    app: foo
  ports:
    - port: 8080
---
kind: Pod
apiVersion: v1
metadata:
  name: bar-app
  labels:
    app: bar
spec:
  containers:
    - name: bar-app
      image: 'kicbase/echo-server:1.0'
---
kind: Service
apiVersion: v1
metadata:
  name: bar-service
spec:
  selector:
    app: bar
  ports:
    - port: 8080
---
apiVersion: networking.k8s.io/v1
kind: Ingress
metadata:
  name: example-ingress
spec:
  rules:
    - http:
        paths:
          - pathType: Prefix
            path: /foo
            backend:
              service:
                name: foo-service
                port:
                  number: 8080
          - pathType: Prefix
            path: /bar
            backend:
              service:
                name: bar-service
                port:
                  number: 8080
---
Apply the contents

        kubectl apply -f https://storage.googleapis.com/minikube-site-examples/ingress-example.yaml

Wait for ingress address

        kubectl get ingress


NAME              CLASS   HOSTS   ADDRESS          PORTS   AGE
example-ingress   nginx   *       <your_ip_here>   80      5m45s


Note for Docker Desktop Users:
To get ingress to work you’ll need to open a new terminal window and run minikube tunnel and in the following step use 127.0.0.1 in place of <ip_from_above>.

Now verify that the ingress works

        $ curl <ip_from_above>/foo

Request served by foo-app
...

        $ curl <ip_from_above>/bar
Request served by bar-app
...


5. Manage your cluster

Pause Kubernetes without impacting deployed applications:

        minikube pause


Unpause a paused instance:
        minikube unpause

Halt the cluster:
        minikube stop

Change the default memory limit (requires a restart):
        minikube config set memory 9001

Browse the catalog of easily installed Kubernetes services:
        minikube addons list

Create a second cluster running an older Kubernetes release:

        minikube start -p aged --kubernetes-version=v1.16.1

Delete all of the minikube clusters:
        minikube delete --all

Installing Helm & Kubernetes in Docker

Installing Helm & Kubernetes in Docker


Helm is simply a package manager for Kubernetes. It helps you manage Kubernetes applications — Helm Charts helps you define, install, and upgrade even the most complex Kubernetes application.


Implementation:

Follow the below steps to install Helm and Kubernetes in Docker:


Step 1: Installing Docker

- First, download the Docker.exe from the official site.

- Install the docker.exe file on your desktop.

- After installation is complete, restart your desktop.


Step 2: Enabling Kubernetes in Docker Application


Kubernetes, also known as K8s, is an open-source system for automating deployment, 

scaling, and management of containerized applications.  


If you want to install Kubernetes, just follow the simple steps:

- Open Docker Application.

- Click Settings -> Kubernetes  -> Enable Kubernetes


Step 3: Adding Helm package for Kubernetes:


There are two ways by which you can add Helm package:


A. Using Chocolatey Package Manager(Windows):

First, ensure that you are using an administrative shell.

Run Set-ExecutionPolicy Bypass -Scope Process on your command to check the execution policy

Now to download choco on your system, copy the following code and paste it on your command shell-


Set-ExecutionPolicy Bypass -Scope Process -Force;

[System.Net.ServicePointManager]::SecurityProtocol = [System.Net.ServicePointManager]::SecurityProtocol -bor 3072; iex ((New-Object System.Net.WebClient).DownloadString('https://chocolatey.org/install.ps1'))


Now install helm from chocolatey, go to Command Shell or more commonly known as PowerShell and type:


choco install kubernetes-helm


B.Using Script:

The easiest way is to just copy the following code and paste it on your command shell :- 


curl https://raw.githubusercontent.com/helm/helm/master/scripts/get > get_helm.sh

chmod 700 get_helm.sh

./get_helm.sh


QUARKUS & GraphQL

 QUARKUS & GraphQL https://www.geeksforgeeks.org/graphql-tutorial/ https://quarkus.io/guides/smallrye-graphql-client https://www.mastert...