Question: What is minikube?
Answer: minikube is local Kubernetes, focusing on making it easy to learn and develop for Kubernetes.
All you need is Docker (or similarly compatible) container or a Virtual Machine environment, and Kubernetes is a single command away: minikube start
What you’ll need :
- 2 CPUs or more
- 2GB of free memory
- 20GB of free disk space
- Internet connection
- Container or virtual machine manager, such as: Docker, QEMU, Hyperkit, Hyper-V, KVM, Parallels, Podman, VirtualBox, or VMware Fusion/Workstation
1.Installation
.Easy path is the installation on Windows by using Windows Package Manager:
winget install Kubernetes.minikube
Other ways to install are described here: minikube
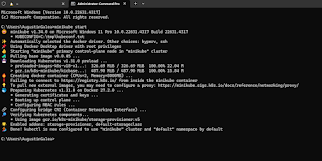
2. Start your cluster
From a terminal with administrator access (but not logged in as root), run:
minikube start
If minikube fails to start, see the drivers page for help setting up a compatible container or virtual-machine manager.
3.Interact with your cluster
If you already have kubectl installed (see documentation), you can now use it to access your shiny new cluster:
kubectl get po -A
Alternatively, minikube can download the appropriate version of kubectl and you should be able to use it like this:
minikube kubectl -- get po -A
You can also make your life easier by adding the following to your shell config: (for more details see: kubectl)
alias kubectl="minikube kubectl --"
Initially, some services such as the storage-provisioner, may not yet be in a Running state. This is a normal condition during cluster bring-up, and will resolve itself momentarily. For additional insight into your cluster state, minikube bundles the Kubernetes Dashboard, allowing you to get easily acclimated to your new environment:
minikube dashboard


4. Deploy applications
4.1 Service
Create a sample deployment and expose it on port 8080:
kubectl create deployment hello-minikube --image=kicbase/echo-server:1.0
kubectl expose deployment hello-minikube --type=NodePort --port=8080
It may take a moment, but your deployment will soon show up when you run:
kubectl get services hello-minikube
The easiest way to access this service is to let minikube launch a web browser for you:
minikube service hello-minikube
Alternatively, use kubectl to forward the port:
kubectl port-forward service/hello-minikube 7080:8080
Tada! Your application is now available at http://localhost:7080/.
You should be able to see the request metadata in the application output. Try changing the path of the request and observe the changes. Similarly, you can do a POST request and observe the body show up in the output.
4.2 Load Balancer
To access a LoadBalancer deployment, use the “minikube tunnel” command. Here is an example deployment:
kubectl create deployment balanced --image=kicbase/echo-server:1.0
kubectl expose deployment balanced --type=LoadBalancer --port=8080
In another window, start the tunnel to create a routable IP for the ‘balanced’ deployment:
minikube tunnel
To find the routable IP, run this command and examine the EXTERNAL-IP column:
kubectl get services balanced
Your deployment is now available at <EXTERNAL-IP>:8080
4.3 Ingress
Enable ingress addon:
minikube addons enable ingress
The following example creates simple echo-server services and an Ingress object to route to these services.
kind: Pod
apiVersion: v1
metadata:
name: foo-app
labels:
app: foo
spec:
containers:
- name: foo-app
image: 'kicbase/echo-server:1.0'
---
kind: Service
apiVersion: v1
metadata:
name: foo-service
spec:
selector:
app: foo
ports:
- port: 8080
---
kind: Pod
apiVersion: v1
metadata:
name: bar-app
labels:
app: bar
spec:
containers:
- name: bar-app
image: 'kicbase/echo-server:1.0'
---
kind: Service
apiVersion: v1
metadata:
name: bar-service
spec:
selector:
app: bar
ports:
- port: 8080
---
apiVersion: networking.k8s.io/v1
kind: Ingress
metadata:
name: example-ingress
spec:
rules:
- http:
paths:
- pathType: Prefix
path: /foo
backend:
service:
name: foo-service
port:
number: 8080
- pathType: Prefix
path: /bar
backend:
service:
name: bar-service
port:
number: 8080
---
Apply the contents
kubectl apply -f https://storage.googleapis.com/minikube-site-examples/ingress-example.yaml
Wait for ingress address
kubectl get ingress
NAME CLASS HOSTS ADDRESS PORTS AGE
example-ingress nginx * <your_ip_here> 80 5m45s
Note for Docker Desktop Users:
To get ingress to work you’ll need to open a new terminal window and run minikube tunnel and in the following step use 127.0.0.1 in place of <ip_from_above>.
Now verify that the ingress works
$ curl <ip_from_above>/foo
Request served by foo-app
...
$ curl <ip_from_above>/bar
Request served by bar-app
...
5. Manage your cluster
Pause Kubernetes without impacting deployed applications:
minikube pause
Unpause a paused instance:
minikube unpause
Halt the cluster:
minikube stop
Change the default memory limit (requires a restart):
minikube config set memory 9001
Browse the catalog of easily installed Kubernetes services:
minikube addons list
Create a second cluster running an older Kubernetes release:
minikube start -p aged --kubernetes-version=v1.16.1
Delete all of the minikube clusters:
minikube delete --all


Niciun comentariu:
Trimiteți un comentariu